Whilst this does move things forward, it will have rendered the library specific only to this sensor.
The code should be put in the main ino and the hex string then passed to the rk_sendData.
Additionally, sending payloads as strings is considered wasteful - conversion to an integer (usually by multiplying by 10, 100 or 1000 etc as appropriate) and then byte packing / shifting is strongly encouraged. As far as the TTN forumites think, any other way is wrong, a heinous crime and bad for the network.
I definitely agree with @nmcc regarding floats. The best approach is to multiply it with 10, 100, etc. then do the conversion on the decoder side of the network server. It is just a simple javascript. But @SWoto’s code above can work as well and you can easily add char or string on your payload. However, if you are only going to send just float values, @nmcc advise is really recommended.
Sadly all too easy - I’ve yet to come across a really good reason for sending plain text in a LoRaWAN payload.
Conversely, I have a very messed up set of utilities I use to bit-pack so if, for example I only need 0-15, I only use 4 bits and the other 4 are used for another value - it handles all the fun of crossing byte boundaries. Perhaps I should clean it up and release it.
I think with what i’m going to say I might be stepping outside the topic question, though I’m not sure because it is related with the replies. Mods, please correct me if I’m wrong.
@nmcc, @carlrowan, regarding the discussion about sending it as int or float and the usage of plain text, if you have three sensors (assume temperature, humidity and pressure) how would you send it with LoRaWAN? Three frames with the value as int, or try to fit it in a frame separated by some character?
No, no, no, no, never, ever. Never ever think like that again or the LoRaWAN SWAT team will visit.
That implies three transmissions - three times you use you battery.
Try? Do or do not, there is no try!
The LoRaWAN SWAT team won’t come for this, they just send the LoRaWAN police around to fine you 100 batteries - as this will add to battery burn.
OK, I’ll stop encouraging a search using the forum, TTN forum or Mistress Google and go for the direct answer using Arduino code:
#define PAYLOAD_SIZE  6

void setup() {

  Serial.begin(9600);
  Serial.println("LoRaWAN using RAK library payload demo");

  int data[PAYLOAD_SIZE]; //  binary data structure with enough bytes for the payload

  int temperature = 20;
  int humidity = 35;
  int pressure = 935;

/* This is where you get your readings
  // Get your readings
  temperature = getTheTemperature();
  humidity = getTheHumidity();
  pressure = getThePressure();
*/

  // Transfer to the binary data structure
  data[0] = highByte(temperature);
  data[1] = lowByte(temperature);
  data[2] = highByte(humidity);
  data[3] = lowByte(humidity);
  data[4] = highByte(pressure);
  data[5] = lowByte(pressure);

  // Convert to a HEX string
  String payload = "";
  for(int c = 0; c < PAYLOAD_SIZE; c++) {

    if(data[c] < 0x10) {  // If it is less that 10, we'll need to put the 0 in as the Arduino String function doesn't pad with leading 0's
        payload += '0';
    }

    payload += String(data[c], HEX);

  }

  payload.toUpperCase(); // Converts in place, just to add to new programmer confusion

  Serial.print("Payload as Hex string: ");
  Serial.println(payload);

  // RAKLoRa.rk_sendData(1, payload) // This is where we send the payload

  // Note, buffer is a reserved word in Arduino, so I don't use buffer, I use payload, but the RAK examples do, your mileage may vary

}

void loop() {
}
You can also convert Arduino Uno to 3.3v volts operation with some tweaking. Replace the 5V regulator with 3.3v and solder some jumper wires “here and there” on the board.
I did this before. However, the atmega328 will be out of specs at 3.3v when running at 16Mhz. It is somehow overclocked. But for quick testing, it works. In production, I wont recommend it.
It should work directly without extra wiring. But there are different revisions of RAK811 Wisnode/Wisduino. If you got any issues, i’ll help you solve it.
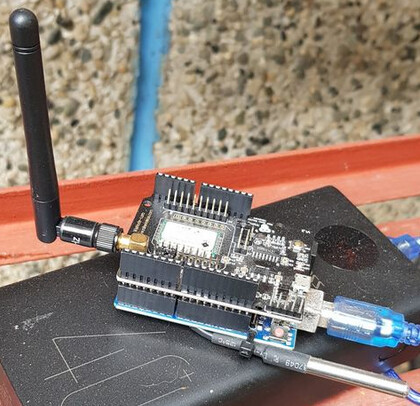
Here is my end-device temperature sensor with arduino uno and RAK811 board. Powered by 40Ah powerbank so it will run forever
Hi Nick,
I try to put your payload coder in my schetch and arduino did not compile becouse this erorr:
"no matching function for call to ‘RAK811::rk_sendData(int, String&)’
"
Could you help me please ?
Not to hand due to a whole raft of technical reasons about how I code.
That code segment was written to demonstrate how to turn a byte array in to a hex string for the RAK811 - so you should be able to copy it over in to your working sketch to turn your payload array in to the string the 811 needs.
But if you give me a few hours and I’ll integrate it in to a working sketch.
Hi Nick I did copy in my schetch and transformation is ok . i did DebugPrint of payload and all is ok . The problem is when i try to send using RAK811 send function , arduino did not compile and post that erorr
Will be wonderfull if you can integrate that function, in to one demo schetch. I thing you will help a lot of people not only me with that demo. All that we can find at rak is RUI or sending something from buffer.
From what I can tell from RAKwireless’ website, the RAK811 is no longer in production. Reference is made there to what looks to be just a chip.
Am having a similar issue with connecting RAK19001/RAK11310 with Arduino Uno R3 for inter-device serial communication. Would prefer to do this solderless as part of a proof-of-concept. The community’s advice would be welcomed.
One easy but expensive solution I see is to use an Rpi to act as a programmable USB hub. Have done that successfully to link more than one Arduino for serial comm between them. Should also work between RAK/Arduino.
You can use the RX1/TX1 lines of the RAK19001 Base Board to connect to the Arduino UNO.
BUT
You need a voltage-level translator for the signals. WisBlock UART’s RX/TX lines works only with 3.3V. The Arduino UNO is using 5V on its RX/TX lines. Without changing the voltage levels, you might destroy the RAK11310.
Yes. True. But I wanted to observe the dataflow between units as part of the development/debugging process. Used an RPi as a programmable USB Hub. This has worked out quite well and it also allows up to four devices to be interfaced.
Eventually, I’ll post the software and documentation on GitHub to replace an older version of the larger project. Could do that earlier if there is interest.