Join - OTAA -- get DevAddr, NwkSKey, AppSKey

I am starting to develop a LoRaWAN Node, with the sample LoRaWAN_OTAA_ABP.ino . (RAK4631)

I am able to JOIN my network, with AWS IoT … with the automatic method OTAA.

I know that after my node JOIN’s, it needs to obtain the following three items:

  • DevAddr
  • NwkSKey
  • AppSKey

Is there an API call that the code on my Node to obtain these values?

Hi @jonovos ,

I am not sure what is the purpose why you need the session keys after successful join but you can check this github discussion as reference. The user has to retrieve the session keys so that he only needs to do OTAA join once to the network then switch to ABP.

Implementation is on this commit but I personally haven’t tried this.

My situation is similar to that github discussion.

I need to obtain the keys so that I can store them in non-volatile memory. Then my device can safely power-off. Subsequent power-on’s will fetch these stored keys, and then re-use them by joining with ABP. I expect this wil work until either too much silence-time has elapsed, OR, the FCnt over-flows. Under these expiration conditions, a fresh OTAA will obtain a new set of keys.

I am programming my RAK4631/4630, using Arduino IDE. I know of no other way to create an application for it.

Therefore, is there an API call exposed through the Arduino Library which will provide my application with the Joined Keys?

PS.: In the discussion linked above, User avillacis refers to the function:
LoRaMacStatus_t LoRaMacMibGetResponseConfirm( MibRequestConfirm_t *mibGet );

This would be ideal, IF it existed in the Arduino Library. (Mine compiles, but has LINK ERRORS - doesn’t exist in Library.)

Hi @jonovos ,

As far as I know, this is not exposed on the library.

Smaller change in the library could give you the AppsKey and NwSkey:

Not with API calls (that would be my preferred method), but with direct access to the variables.

If I find time over the weekend, I might implement the API calls.

Then you could save the keys and device address and restart in ABP mode using them.

1 Like

I am doing the same environment with VSCode/PlatformIO, where I did some steps:

  1. In the Platformio.ini file, I created some definitions instead in the .h file. For OTAA, you will need LoRa keys: Device EUI, Application EUI and Application Key
    1.1) projectconf

This is just a example, you will need to replace these keys, by your keys

[upload_settings]
device_eui 	= '0xAC, 0x1F, 0x09, 0xFF, 0xFE, 0x0C, 0xF0, 0x41'
app_eui		= '0xAC, 0x1F, 0x09, 0xFF, 0x00, 0x00, 0x00, 0x02'
app_key		= '0x4B, 0x41, 0x70, 0x70, 0x6C, 0x69, 0x63, 0x61, 0x74, 0x69, 0x6F, 0x6E, 0x20, 0x4B, 0x65, 0x79'

[env:wiscore_rak4631]
platform = nordicnrf52
board = wiscore_rak4631
framework = arduino
; upload_port = COM7
monitor_speed = 115200
; monitor_dtr = 0
; monitor_rts = 0
lib_deps = 
	sparkfun/SparkFun LIS3DH Arduino Library @ ^1.0.3
	adafruit/Adafruit BME680 Library @ ^2.0.4
	sparkfun/SparkFun u-blox GNSS Arduino Library @ ^2.2.27
	beegee-tokyo/SX126x-Arduino @ ^2.0.26
	beegee-tokyo/RAK15007-CY15B108QN @ ^1.0.0
	bblanchon/ArduinoJson @ ^7.0.4
	sabas1080/CayenneLPP @ ^1.1.0
; build_type = debug
build_flags =
	; configurações da porta serial
	-D MONITOR_SPEED=115200
	-D UPLOAD_SPEED=115200
	; Debug opções
 	-D D_DESABILITA=0
	-D D_LED=1
	-D D_INFORMA=2
	-D D_ERRO=3

	-D CFG_DEBUG=D_LED

	; LEDs
	-D LED_GREEN=PIN_LED1
	-D LED_BLUE=PIN_LED2
	;-D PIN_LED2=36
	;-D LED_STATE_ON=1
	; calibração das variáveis ambientais
	-D SEALEVELPRESSURE_HPA=1010.0
	; Desabilitar INT1/INT2 no RAK1904 para evitar conflito com RAK5801
	; INT1 de RAK1904
	; -D LIS3DH_CTRL_REG3=0x25
	; INT2 de RAK1904 .
	; -D LIS3DH_CTRL_REG6=0x25
	
	; Bateria
	-D PIN_VBAT=WB_A0
	; Millivolts per LSB 3.0V ADC range and 12-bit ADC resolution = 3000mV/4096 */
	-D VBAT_MV_PER_LSB=0.73242188F  ; 3.0V ADC range and 12 - bit ADC resolution = 3000mV / 4096
	-D VBAT_DIVIDER_COMP=1.73       ; Compensation factor for the VBAT divider, depend on the board


	; LoRa
	-D REGION=LORAMAC_REGION_AU915
	-D SUBBAND=1
	-D SCHED_MAX_EVENT_DATA_SIZE=APP_TIMER_SCHED_EVENT_DATA_SIZE ; /**< Maximum size of scheduler events. */
	-D SCHED_QUEUE_SIZE=60										 ; /**< Maximum number of events in the scheduler queue. */
	-D LORAWAN_DATERATE=DR_0
	-D LORAWAN_TX_POWER=TX_POWER_0
	-D JOINREQ_NBTRIALS=3

	-D DEV_EUI=${upload_settings.device_eui}
	-D APP_EUI=${upload_settings.app_eui}
	-D APP_KEY=${upload_settings.app_key}

  1. In the C++ code:
void LoRaInit()
{
	lora_rak4630_init(); // Inicia o radio LoRa

	if (CFG_DEBUG >= D_INFORMA) {
		Serial.println("=====================================");
		Serial.println("   Bem vindo ao LoRa do RAK4630!!!   ");
		Serial.println("=====================================");
	}
	lmh_setDevEui(nodeDeviceEUI);
	lmh_setAppEui(nodeAppEUI);
	lmh_setAppKey(nodeAppKey);

If you need more information, we are here to help you.

I hope that it is useful.

Regards,

Claudio

Good news everyone…

First, thank you all, for your comments. I have answers now.

In my Arduino application LoRaWAN_OTAA.ino, I changed the function as below, to print out the values I need. (Please forgive the bad formatting. It was not my fault.)

void lorawan_has_joined_handler(void)
{
  if(doOTAA == true)
  {
    MibRequestConfirm_t  mibReq;
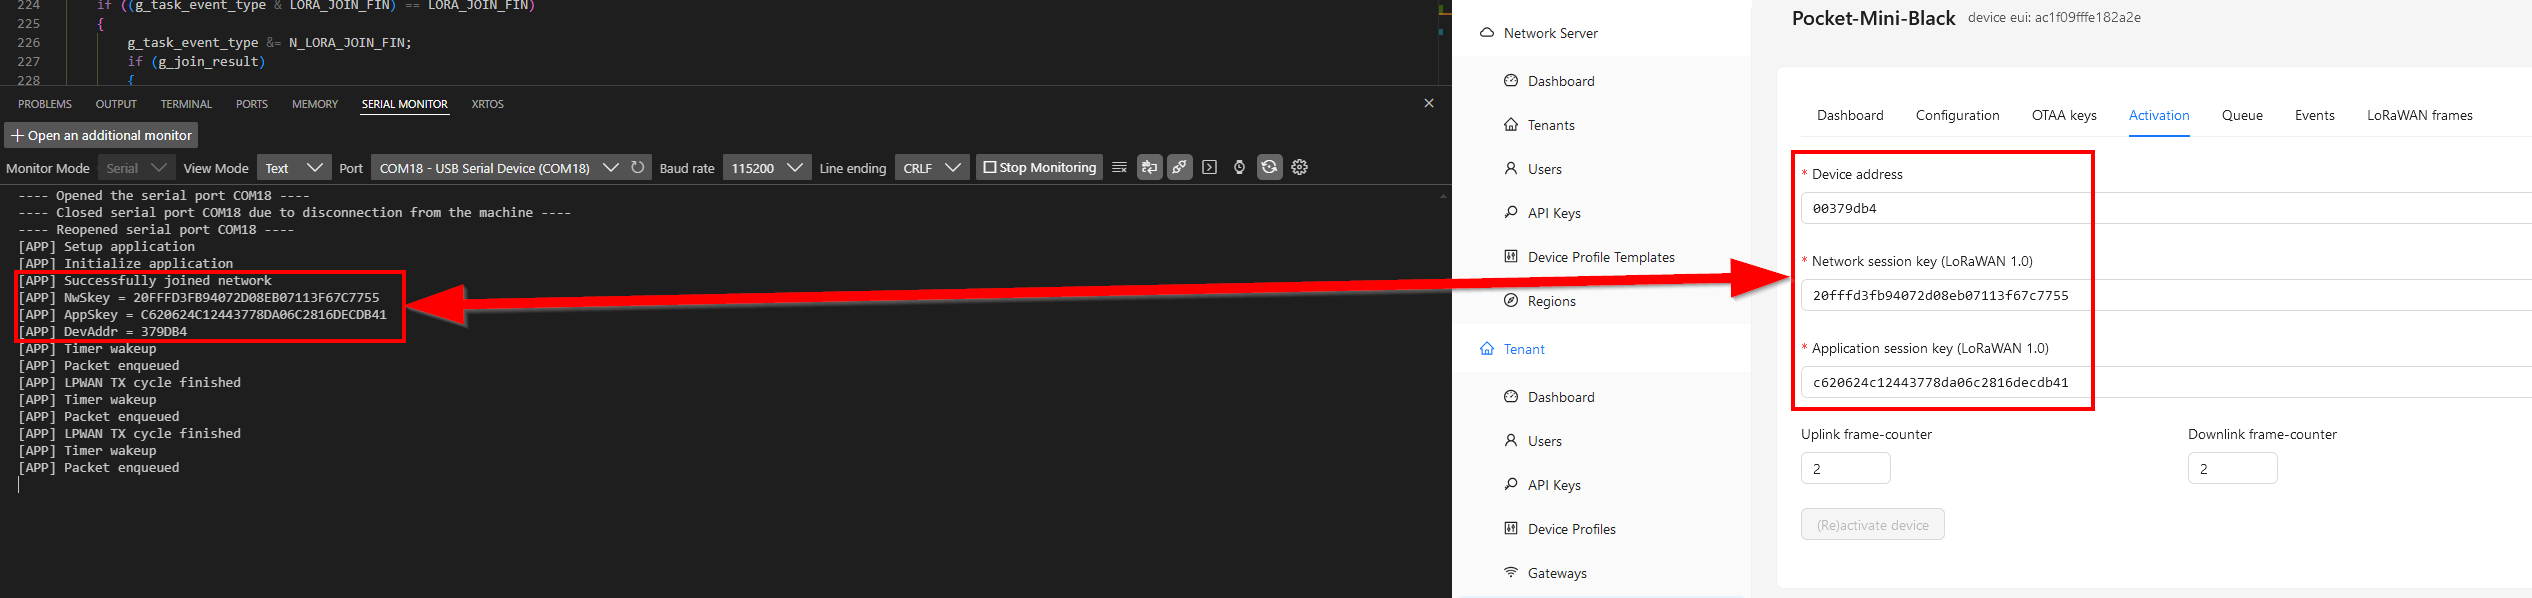
    Serial.print("OTAA Mode, Network Joined!\r\n");

    mibReq.Type  = MIB_DEV_ADDR;
    if (LORAMAC_STATUS_OK == LoRaMacMibGetRequestConfirm( & mibReq )) {
        Serial.printf("uint32_t nodeDevAddr     =   0x%08x;\r\n", mibReq.Param.DevAddr );
    }

    mibReq.Type  = MIB_NWK_SKEY;
    if (LORAMAC_STATUS_OK == LoRaMacMibGetRequestConfirm( & mibReq )) {
        uint8_t *pk = mibReq.Param.NwkSKey;
        Serial.printf("uint8_t  nodeNwsKey[16]  = { 0x%02X,0x%02X,0x%02X,0x%02X, 0x%02X,0x%02X,0x%02X,0x%02X,   0x%02X,0x%02X,0x%02X,0x%02X, 0x%02X,0x%02X,0x%02X,0x%02X };\r\n",
                pk[ 0], pk[ 1], pk[ 2], pk[ 3],
                pk[ 4], pk[ 5], pk[ 6], pk[ 7],
                pk[ 8], pk[ 9], pk[10], pk[11],
                pk[12], pk[13], pk[14], pk[15]  );
    }

    mibReq.Type  = MIB_APP_SKEY;
    if (LORAMAC_STATUS_OK == LoRaMacMibGetRequestConfirm( & mibReq )) {
        uint8_t *pk = mibReq.Param.AppSKey;
        Serial.printf("uint8_t  nodeAppsKey[16] = { 0x%02X,0x%02X,0x%02X,0x%02X, 0x%02X,0x%02X,0x%02X,0x%02X,   0x%02X,0x%02X,0x%02X,0x%02X, 0x%02X,0x%02X,0x%02X,0x%02X };\r\n",
                pk[ 0], pk[ 1], pk[ 2], pk[ 3],
                pk[ 4], pk[ 5], pk[ 6], pk[ 7],
                pk[ 8], pk[ 9], pk[10], pk[11],
                pk[12], pk[13], pk[14], pk[15]  );
    }

    mibReq.Type  = MIB_UPLINK_COUNTER;
    if (LORAMAC_STATUS_OK == LoRaMacMibGetRequestConfirm( & mibReq )) {
        uint32_t cc = mibReq.Param.UpLinkCounter;
        Serial.printf("uint32_t  nUpLinkCounter = %d;\r\n",  cc );
    }

  }
  else
  {
    Serial.print("ABP Mode !!! OK!\r\n");
  }
  //  o o o   o o o   o o o

Furthermore, I record the last successful Frame-Counter value, which is needed when my device wakes up and re-connects:

   // o o o   o o o   o o o
      MibRequestConfirm_t  mibReq;
    // o o o    o o o    o o o
    mibReq.Type  = MIB_UPLINK_COUNTER;
    if (LORAMAC_STATUS_OK == LoRaMacMibGetRequestConfirm( & mibReq )) {
        uint32_t cc = mibReq.Param.UpLinkCounter;
        Serial.printf("uint32_t  nUpLinkCounter = %d;\r\n",  cc );
    }

Congratulations!

Let me give up a tip. When you have a some kind of code to attach, you can use in the post tool bar a “Preformatted text” “</>” and all your code will be putted in a window , like a did in my post.

Have a nice weekend.

Claudio