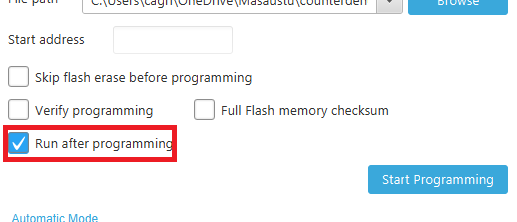
The RAK3172 doesn’t work unless I check the option I marked in red when uploading my hex file to my RAK3172. If I check it, the program starts to run after it is loaded and I can read the information on the serial port screen.
But if I don’t check it, the program neither works nor responds to AT commands.
I’m editing code on Arduino IDE but can’t upload at there.
So i’m compiling and producing hex file on Arduino IDE and flashing it with STM32Programmer.
Update: Now i flashed hex file but it only responds to AT commands although i checking same checkbox. Program isn’t running inside.
Is the STM32Programmer a custom tool? The official one is STM32CubeProgrammer and been released many years ago to unify different sw tools for stm32 chips.
As for boot mode, if you are pertaining to the UART bootloader, the Boot0 pin must be pulled up then reset the module to proceed on bootloader mode.
If bootloader of of RUI3, AT+BOOT will activate RUI3 bootloader.
My suggestion/s will be:
Solve the issue on Arduino IDE.
Upload .bin file generated by Arduino compilation and not the hex.
Use STM32CubeProgrammer RAK DFU Tool or WisToolBox to upload the bin generated.
It’s part of the same official tool suite. If you have a binary, you can use this tool to upload the binary to your STM32 board. But you also can do other things like zeroing a chip, read the memory back to your computer, etc.
You should be able to upload the firmware with Arduino IDE… That’s the real issue.
Connect the board directly via USB, select the port in Tools, and open the Serial monitor. Type AT+BOOT then enter. It will put the device in boot mode. Close the monitor and click upload.