Flashing the bootloader using the RACDAP1 with RAK2270

@carlrowan @beegee

As far as I can tell the RAK2270 has no manual way to force bootloader mode. I typically use the AT command AT+BOOT and it’s buddy AT+RUN but every once in a while uploaded code throws the board into a while loop that disables AT commands, basically bricking my board.

I know there is a boot0 pin but I think that loads a factory reset bootloader for STM32 boards.

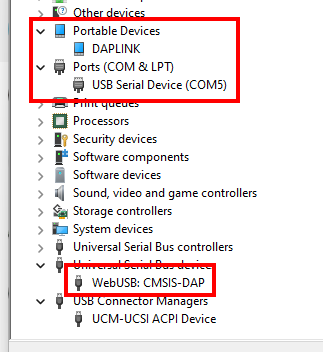
I simplify code for students and try to stay away from JTAG: SWCLK and SWDIO debuggers (I have several and each experience is painful except the Particle debugger which is also a DAP method which does work for Drag and Drop to windows) but probably a good idea for me to be able to use a debugger if I am going to teach with the RAK2270 and the RAKDAP1.

Theoretically the DAP boards are drag and drop of a .bin or .hex file if anyone can prove that drag and drop works on windows I would be really happy. If I try it with the RAK2270 .hex file here it actually tries to work just hangs on the RESET.

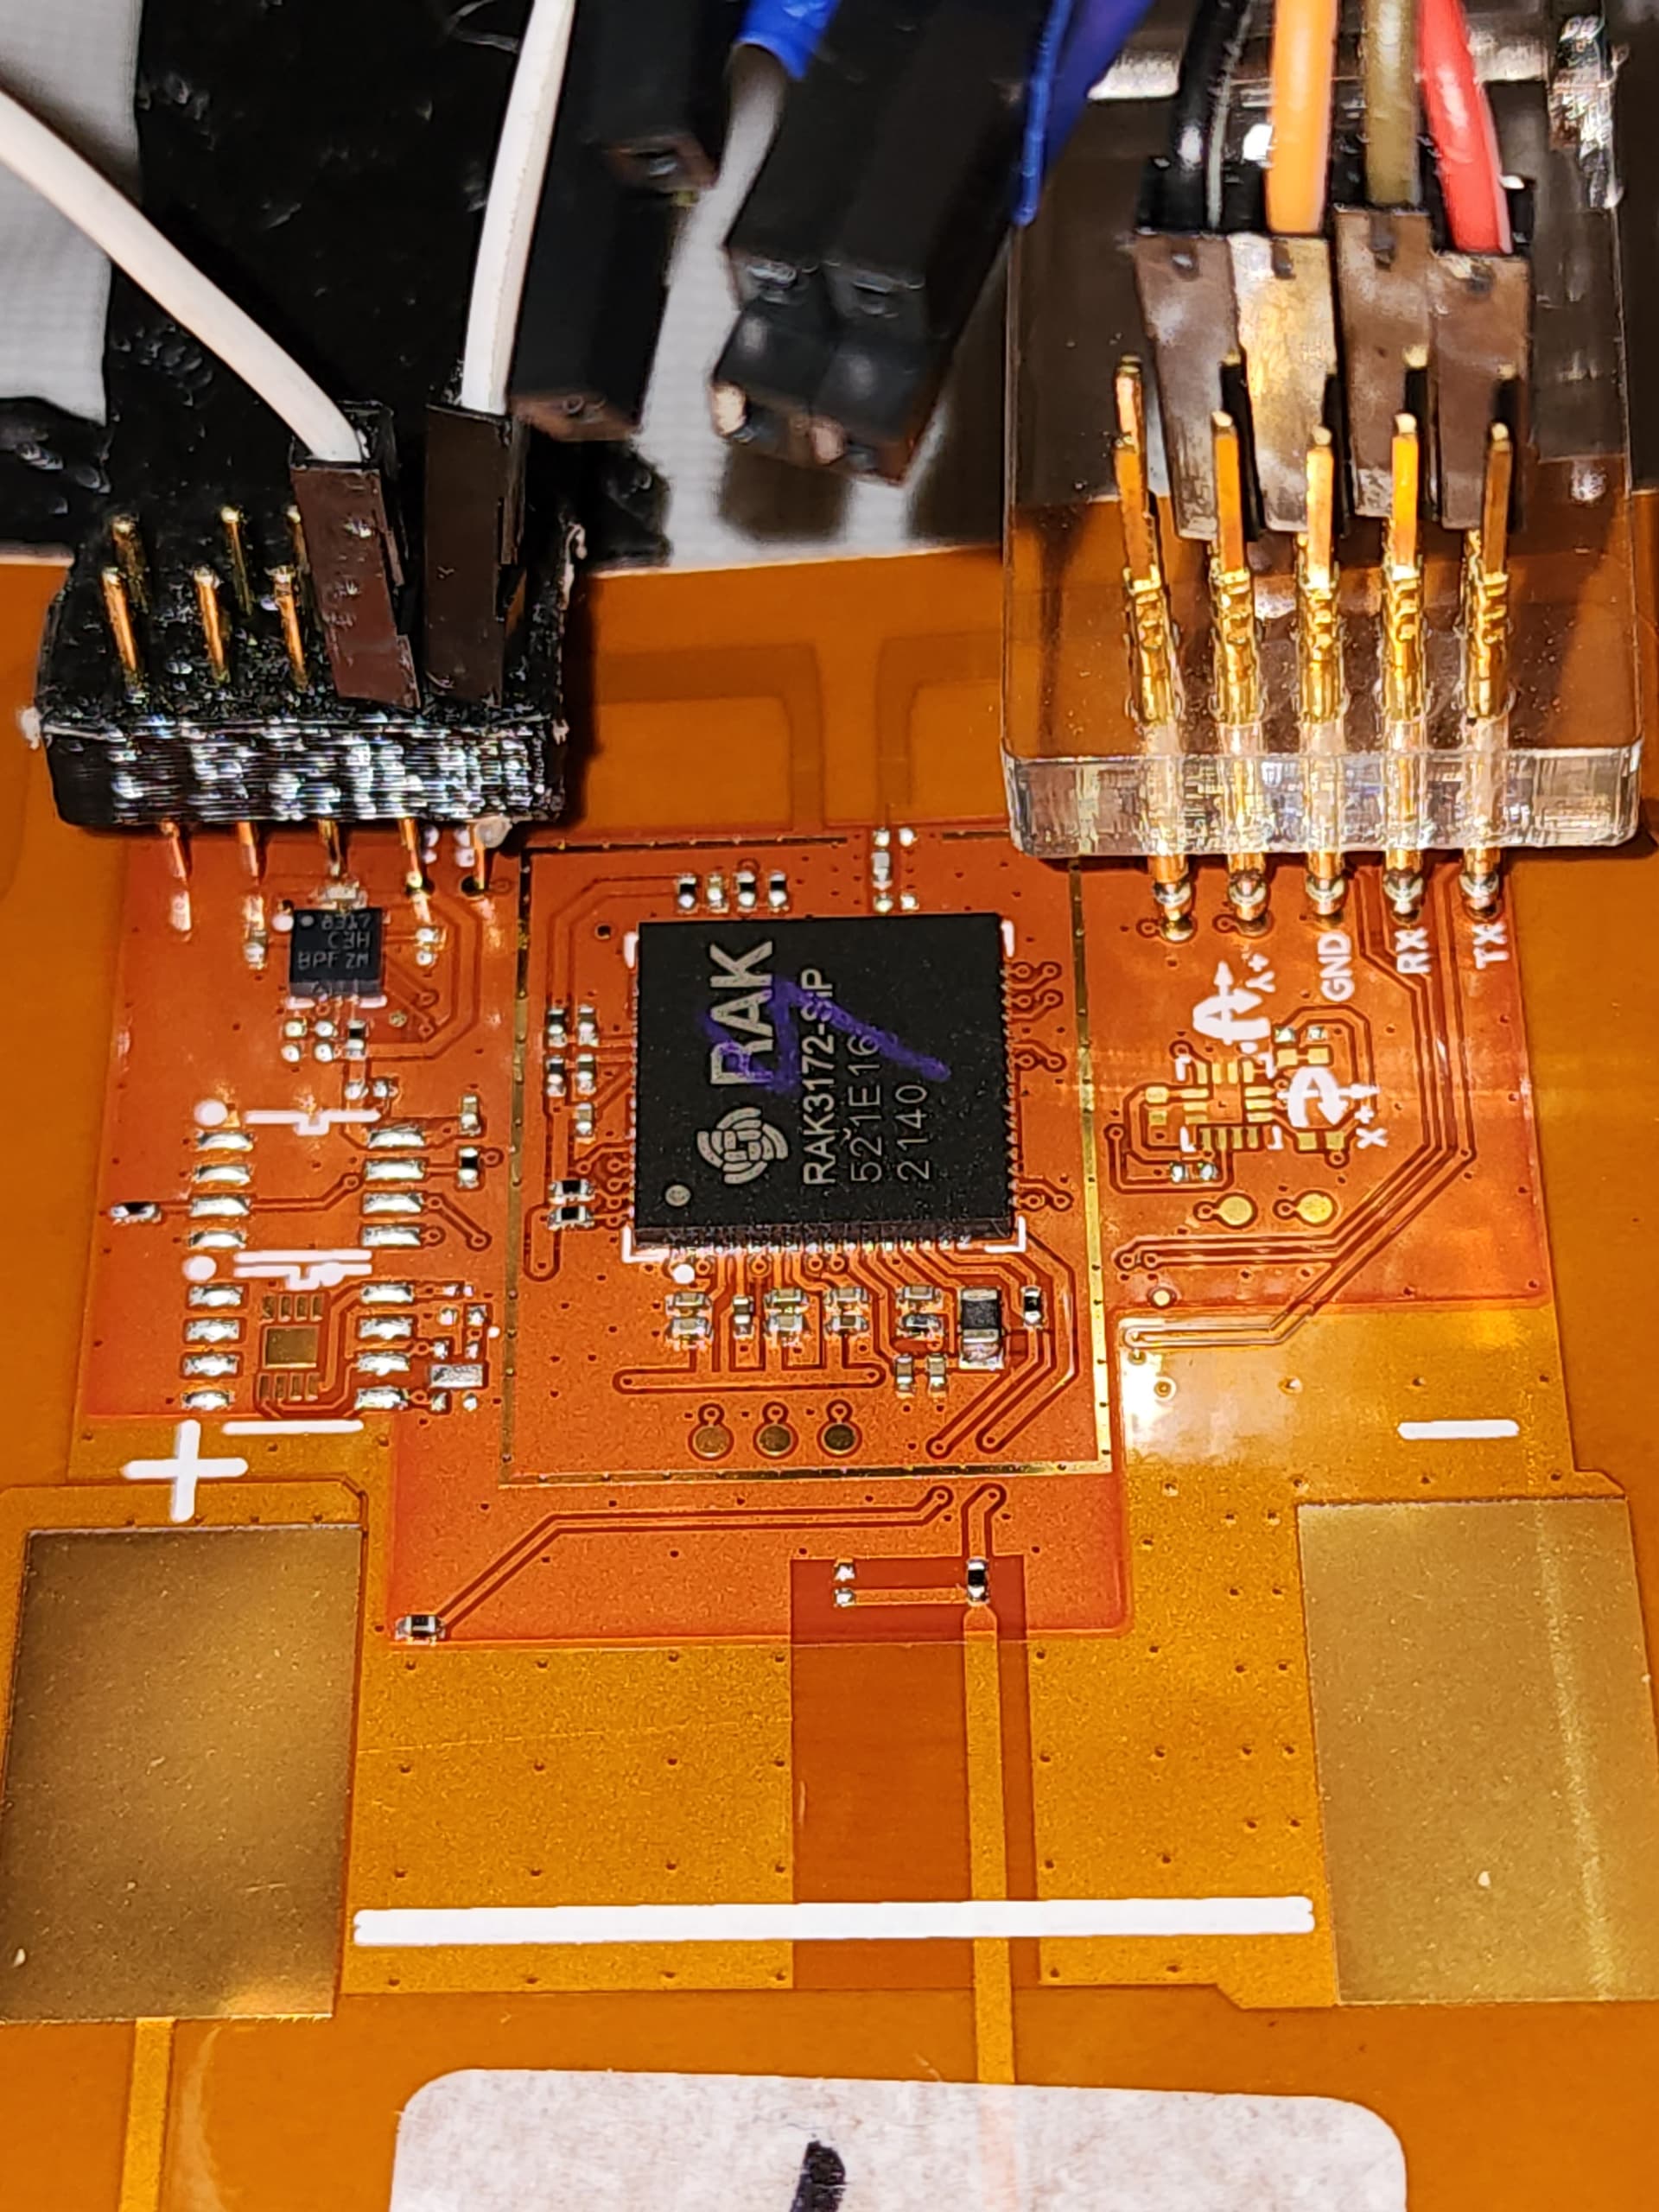
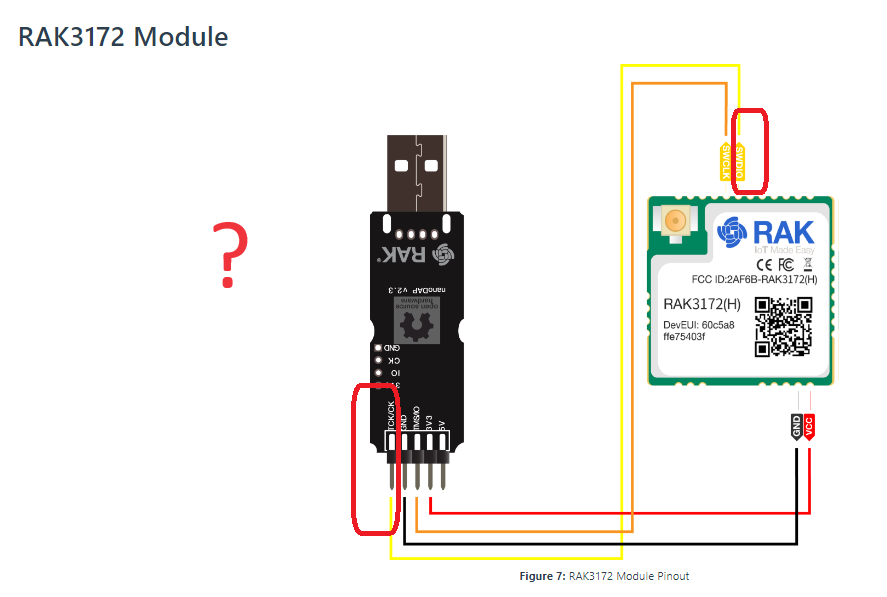
First issue is the diagram for the RAK2270 main module the with the RAKDAP1 seems to have SWCLK and SWDIO mixed up. Can someone clarify.


[RAK3172] (Quick Start Guide | RAKwireless Documentation Center)

The actual python commands at the quickstart guide seem simple enough I will give them a try and get back to you.

P.S. my Course thread is here RAK2270 IOT Course

So my venture into Python is not going to bad. Followed these steps


https://www.python.org/downloads/
check install paths

python --version
pip --version
pip3 --version
pip3 install pyocd
pyocd --version

pyocd pack --i stm32wle5

(this takes a while)
pyocd pack -s

Grab the .hex file for download

go to the downloads folder and open a terminal
check the packages are there and your path works

pyocd pack -s

So far so good.

Connect my RAK2270 board with the RAKDAP1 and connect to the computer and type

pyocd list

It replies with


  0   ARM CMSIS-DAP-v1-MuseLab   0700000100340076340000184e543352a5a5a5a597969908   ✖︎ stm32f103rb
      NUCLEO-F103RB

which seems fine, but when I type


pyocd flash -t stm32wle5jcix RAK2270.v1.0.0.RC6.ForStandard.hex


I get this error

pyocd flash -t stm32wle5 RAK2270.v1.0.0.RC6.ForStandard.hex
0001383 W STLink, CMSIS-DAPv2 and PicoProbe probes are not supported because no libusb library was found. [common]
0001944 C Target type stm32wle5 not recognized. Use 'pyocd list --targets' to see currently available target types. See <https://pyocd.io/docs/target_support.html> for how to install additional target support.

But I already checked that pyocd list found the RAKDAP1.

Someone probably knows what to do @beegee perhaps. I found this link Target support — pyOCD

The webUSB interface is installed

.
Any suggestions. Looks like I have to load zadag.exe but where would I get libusb ?

This github looks interesting

Specifically nanoDAP/user_manual_en.md at master · wuxx/nanoDAP · GitHub

and

Hi @jerteach ,

Thanks for sharing your insights.

  1. I always use the STM32 Bootloader via BOOT0 pin to recovery bricked RAK3172 using STM32CubeProgrammer. This is very convenient since it uses the same UART2 connection. No need for external tools.
  2. I have no idea yet the drag and drop approach for RAKDAP1 since I always use pyocd.
  3. The connection of RAKDAP1 and RAK3172 is wrong and should be reversed. I will update the docs.
  4. On you error on RAKDAP1, do you have nucleo board connected? It seems not to be able to detect the RAKDAP1 but instead a nucleo board.

@carlrowan

Here is an update. On Linux Ubuntu I got past the above libusb issue and also discovered a naming issue by running pyocd list --targets


 stm32wle5c8ux             STMicroelectronics       STM32WLE5C8Ux                STM32WL Series, STM32WLE5   pack
  stm32wle5cbux             STMicroelectronics       STM32WLE5CBUx                STM32WL Series, STM32WLE5   pack
  stm32wle5ccux             STMicroelectronics       STM32WLE5CCUx                STM32WL Series, STM32WLE5   pack
  stm32wle5j8ix             STMicroelectronics       STM32WLE5J8Ix                STM32WL Series, STM32WLE5   pack
  stm32wle5jbix             STMicroelectronics       STM32WLE5JBIx                STM32WL Series, STM32WLE5   pack
  stm32wle5jcix             STMicroelectronics       STM32WLE5JCIx                STM32WL Series, STM32WLE5   pack

So my actual install command should be one of the above boards. Any idea which one is correct for the RAK2270?

pyocd flash -t stm32wle5c8ux RAK2270.v1.0.0.RC6.ForStandard.hex

on windows I still get the libusb error

0001331 W STLink, CMSIS-DAPv2 and PicoProbe probes are not supported because no libusb library was found. [common]
0002050 C No ACK received [__main__]

but on Ubuntu I only get the 0002050 C No ACK received [__main__] error

which looks like things are still not communicating.

I think we should start a new thread about the RAK2270 with the STM32CubeProgrammer (I would make a video about it if I can get it working) I am installing it now, and have used it before. I can’t remember if I am supposed to pull BOOT0 low or high I think it is LOW (High would be easiest to short the two pins that are VCC and BOOT0).

About the RAKDAP1 as a drag and drop we probably have to flash specific code to the RAKDAP1 board and I don’t really want to brick it. If anyone can get that working it is so much fun to install .hex files using drag and drop, makes the other methods seem ridiculously difficult.

Not really sure why my board says

0   ARM CMSIS-DAP-v1-MuseLab   0700000100340076340000184e543352a5a5a5a597969908   ✖︎ stm32f103rb
     NUCLEO-F103RB

after pyocd list I don’t own any nucleo boards. What should it say if “libusb” was installed properly?

Speaking of “libusb” is that something I have to use zadag.exe? I don’t really like zadag and some online mutterings about it not working with newer windows. Does anyone have any tutorials about using it and what is the official download site etc?

Hi @jerteach ,

The targets look ok.

Can you please try this to upload the hex?

pyocd flash -t STM32WLE5JCIx RAK3272-SiP_latest_final.hex

Here, I am uploading the RUI3 firmwaare.

The STM32WL chip of RAK3172 and RAK3172-SiP is not the same.

You will see some warnings but it seems to work ok.

I can erase and upload via pyocd.

Btw, using the STM32CubeProgrammer might be worth exploring.

You only need to pull-up the BOOT0 pin then reset. After successful upload, just remove the pull-up on BOOT0 pin then reset or power up again the unit and it will have you hex file uploaded.

@carlrowan I have installed the STM32CubeProgrammer and will try your suggestions. Do you solder the VCC and BOOT0 pads together and then unsolder them, or perhaps use a second RAKClip to set BOOT0 HIGH?

@carlrowan

Here is an update. On Linux Ubuntu I got past the above libusb issue and also discovered a naming issue by running pyocd list --targets


 stm32wle5c8ux             STMicroelectronics       STM32WLE5C8Ux                STM32WL Series, STM32WLE5   pack
  stm32wle5cbux             STMicroelectronics       STM32WLE5CBUx                STM32WL Series, STM32WLE5   pack
  stm32wle5ccux             STMicroelectronics       STM32WLE5CCUx                STM32WL Series, STM32WLE5   pack
  stm32wle5j8ix             STMicroelectronics       STM32WLE5J8Ix                STM32WL Series, STM32WLE5   pack
  stm32wle5jbix             STMicroelectronics       STM32WLE5JBIx                STM32WL Series, STM32WLE5   pack
  stm32wle5jcix             STMicroelectronics       STM32WLE5JCIx                STM32WL Series, STM32WLE5   pack

So my actual install command should be one of the above boards. Any idea which one is correct for the RAK2270?

pyocd flash -t stm32wle5c8ux RAK2270.v1.0.0.RC6.ForStandard.hex

on windows I still get the libusb error

0001331 W STLink, CMSIS-DAPv2 and PicoProbe probes are not supported because no libusb library was found. [common]
0002050 C No ACK received [__main__]

but on Ubuntu I only get the 0002050 C No ACK received [__main__] error

which looks like things are still not communicating.

I think we should start a new thread about the RAK2270 with the STM32CubeProgrammer (I would make a video about it if I can get it working) I am installing it now, and have used it before. I can’t remember if I am supposed to pull BOOT0 low or high I think it is LOW (High would be easiest to short the two pins that are VCC and BOOT0).

About the RAKDAP1 as a drag and drop we probably have to flash specific code to the board and I don’t really want to brick it. If anyone can get that working it is so much fun to install .hex files using drag and drop, makes the other methods seem ridiculously difficult.

Not really sure why my board says 0 ARM CMSIS-DAP-v1-MuseLab 0700000100340076340000184e543352a5a5a5a597969908 ✖︎ stm32f103rb NUCLEO-F103RB after pyocd list I don’t own any nucleo boards. What should it say if libusb was installed properly.

Speaking of “libusb” is that something I have to use zadag.exe? I don’t really like zadag and some online things about it not working with newer windows. Does anyone have any tutorials about using it and what is the official download site etc.

Hi @jerteach ,

  1. Targets looks ok.
  2. Your command should be like this pyocd flash -t STM32WLE5JCIx RAK2270.v1.0.0.RC6.ForStandard.hex. You can also try to rename the hex file without dots (.) I am not sure if it has effect but I usually avoid that and use underscore instead.
  3. We can continue on the new thread for the STM32CubeProgrammer. Boot pin should be high to enable the UART bootloader of STM32.
  4. Your board as MuseLab seems ok. That’s also what I see. Here’s my device manager.
    image
  5. I am not sure if you still need libusb. I used Zadig before but not for RAKDAP1 but for a chinese USB logic analyzer. You can try to installed libusb via Zadig. But I have no idea if it will really help.
1 Like

@carlrowan I am getting some kind of results using the pyocd and pulling the BOOT0 pin HIGH does that make any sense? I am also using one of my DIY 3D Printed clips to hold the BOOT0 to VCC pads together.

Also slightly possible that drag and drop works using this same arraignment of the SWD connections and BOOT0 to VCC. My latest test I got uploading but forgot to blank the old installed program so not yet seeing any positives. The good news is that using this method uploading using pyocd seems to be working. I will test more later, perhaps tomorrow.

@carlrowan

Normally things work better on my home computer. I tried these steps at school and had success even without connecting BOOT0 to VCC. Not really sure why it worked but making things easier is always good. I installed the firmware version RC6 and it seems to be working fine.

I did get the one error, but as I said it actually installed the firmware and it runs so I think the error can be ignored.

@carlrowan

Question: The upload I have been doing is for the Release RC6 firmware. Which runs the sticker tracker as if came from the factory, where do I find just the bootloader? Does it install the bootloader with the factory firmware?

I thought perhaps the Generic one was just the bootloader, but it also seems to install the factory code.

Does the RAK firmware always include the bootloader or can we upload a basic bootloader with nothing buy AT commands working?

Hi Jeremy,

  1. The RC6 firmware is only application code but the RAK2270 has bootloader already. If you only need the bootloader, that is with the hex file of RUI3 firmware of RAK3172-SiP.
  2. Generic is a complete set with actual application code.
  3. Same with #1 the default RUI3 FW has the bootloader code with AT commands :slight_smile:

Sorry for all the questions @carlrowan

I can’t seem to find the bootloader .hex file at GitHub - RAKWireless/RAK-STM32-RUI: RUI3 BSP for RAK3172 modules

What I don’t yet understand is if the RC6.hex firmware file loads the firmware and the bootloader or just the firmware?

For example, If I made and uploaded a blank Arduino sketch would that basically just upload the bootloader?

void setup() {
  // put your setup code here, to run once:

}

void loop() {
  // put your main code here, to run repeatedly:

}

The above code I think would just run the AT commands.

But if my bootloader was actually corrupted, would loading the above program not fix the corrupted bootloader? Does that make any sense. I am trying to figure out if firmware .hex files are both firmware and bootloader or just firmware.