
Having connected everything to everyone through e-commerce, Amazon now connects all things by participating in the Internet of Things (IoT). Through its cloud service, Amazon Web Services (AWS), the technology company now allows devices to connect easily and securely interact with cloud applications and other devices. This cloud platform lets users make their things intelligent by gathering data, examining it, and sending it over to the cloud where further analysis and applications can happen.
AWS offers multi-layered security. AWS’s security includes integration with IAM – its authentication engine, encryption, and customized access control to device data. The cloud also permits users to constantly monitor and audit their assets. Not to mention, AWS is incredibly easy to use as it works with common IoT protocols – HTTPS and MQTT. To expand its compatibility with IoT devices, AWS also partnered with multiple IoT solutions providers like RAKwireless.
As a result of its growing network, billions of devices and trillions of messages are securely processed and routed by the AWS. One of those devices are gateways that act as intermediaries in transmitting to the cloud the data collected from nodes. If you plan to try connecting your gateway to AWS, you may follow the steps below in doing so. Please take note that the instructions will be using two of the market’s commercial gateways: RAK7249 Macro Gateway and RAK7258 Micro Gateway.
Starting with AWS
Create your account in AWS and select an Instance you are going to be running in the AWS Management Console. For this tutorial, we are going to use EC2.
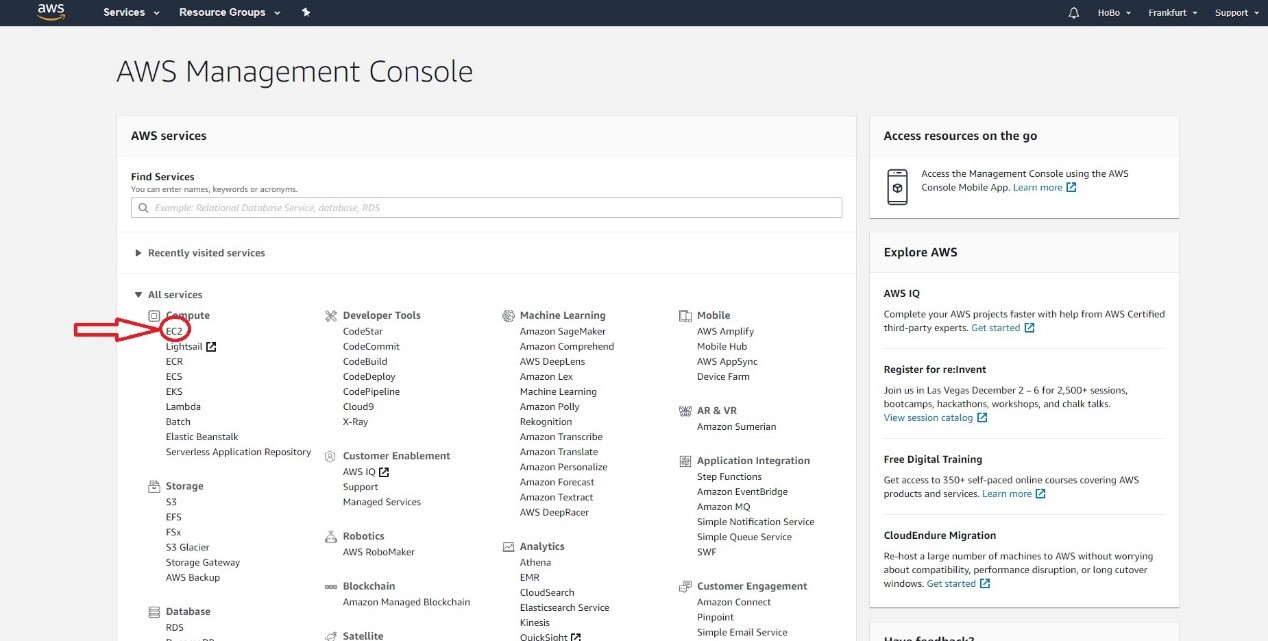
Figure 1 | AWS Management Console
In the following screen, you will see your running Instances, key pairs, security groups, and other information. Press the “Launch instance” button.
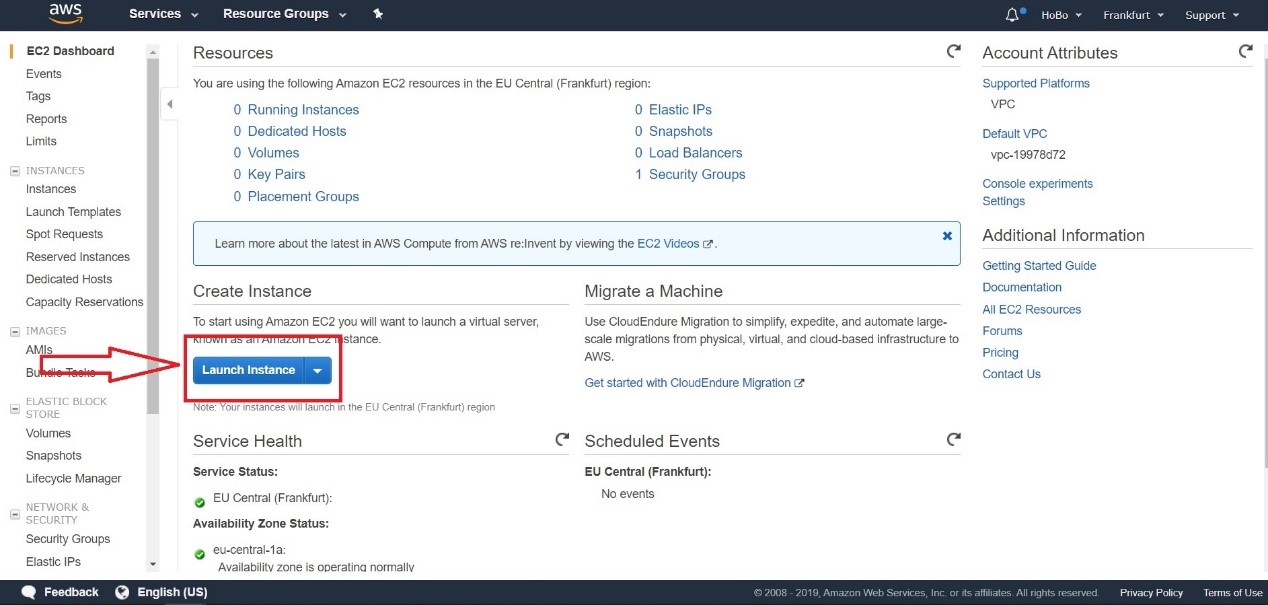
Figure 2 | Launching an Instance
Ubuntu will be used among the ton of operating system choices that AWS offers. Scroll down and choose Ubuntu Server 18.04 LTS (latest at the time of this document). Click “Select.”
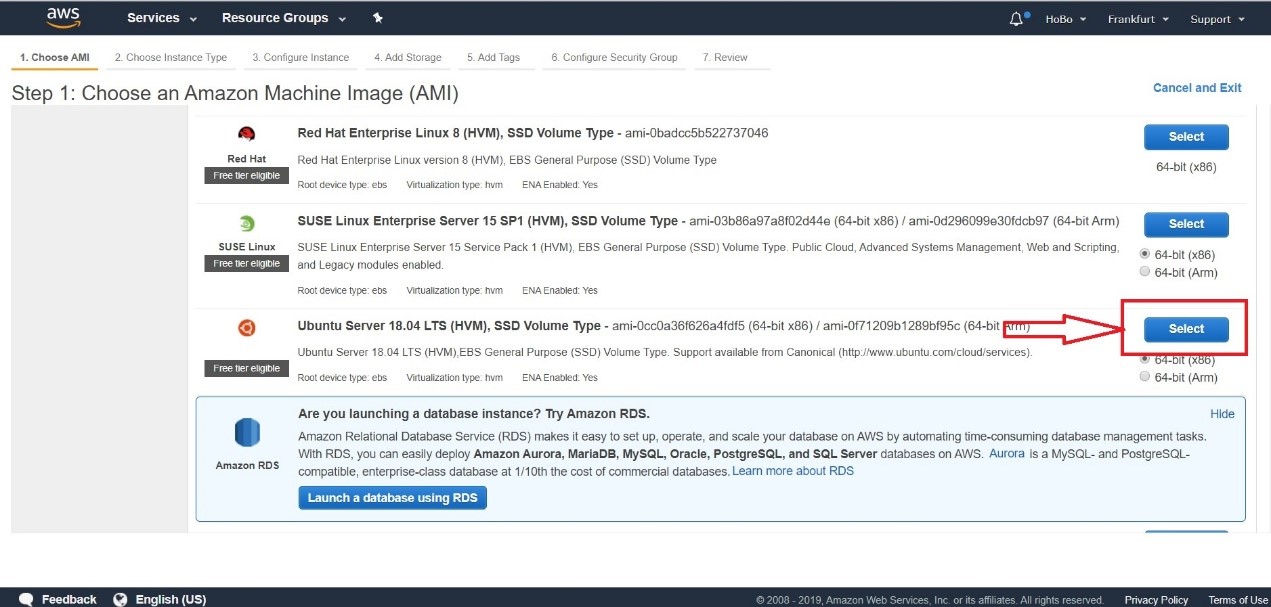
Figure 3 | Selecting the operating system
Configure your instance in the next window then, click “t2.Micro” for the Instance type and press “Review and Launch.”
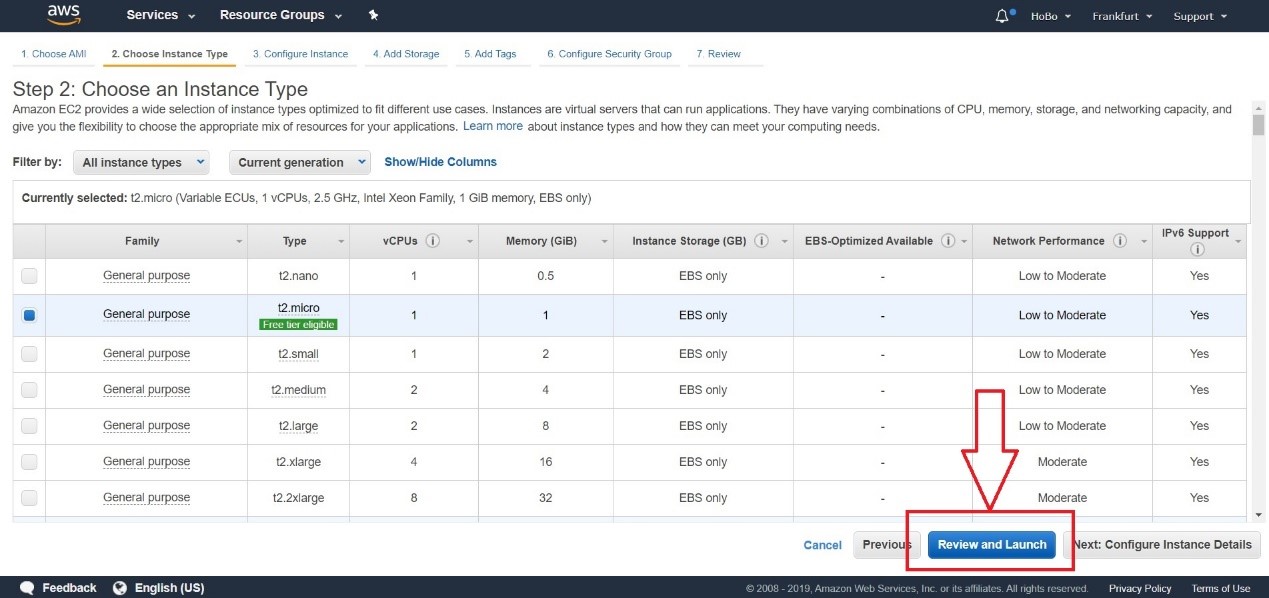
Figure 4 | Selecting the Instance Type
Confirm your choice and Launch (see Figure 5). Security groups will be edited in the next section.
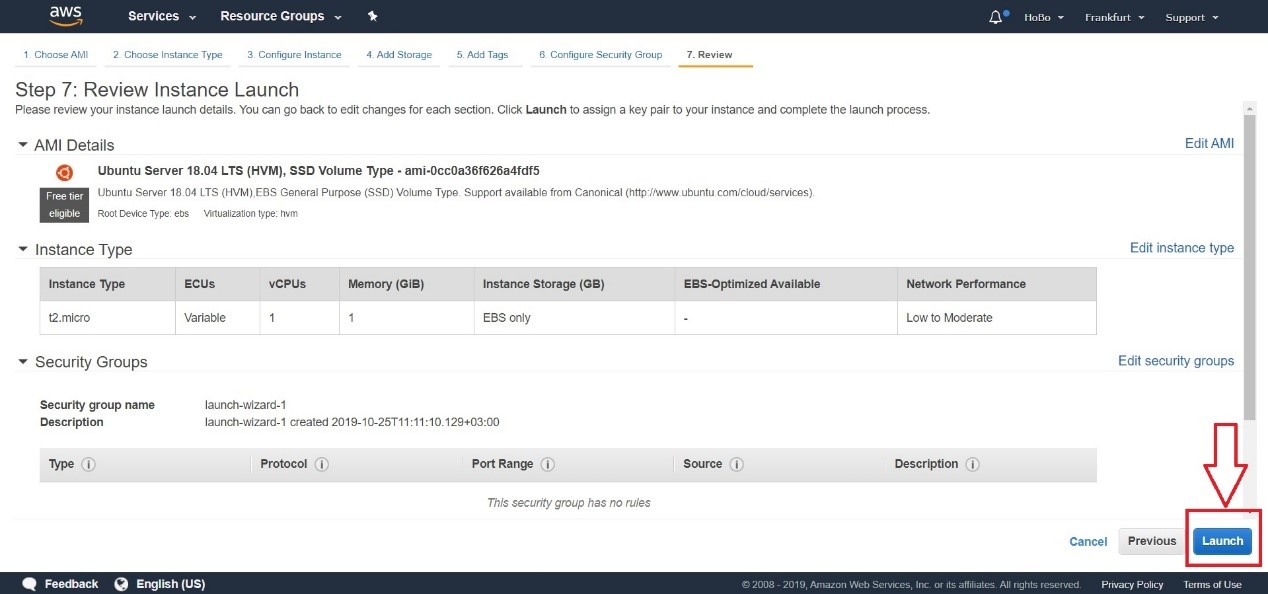
Figure 5 | Launching the Instance
Creating keys and accessing the AWS instance via SSH
We need to create the appropriate access keys to have an SSH session with the Instance.
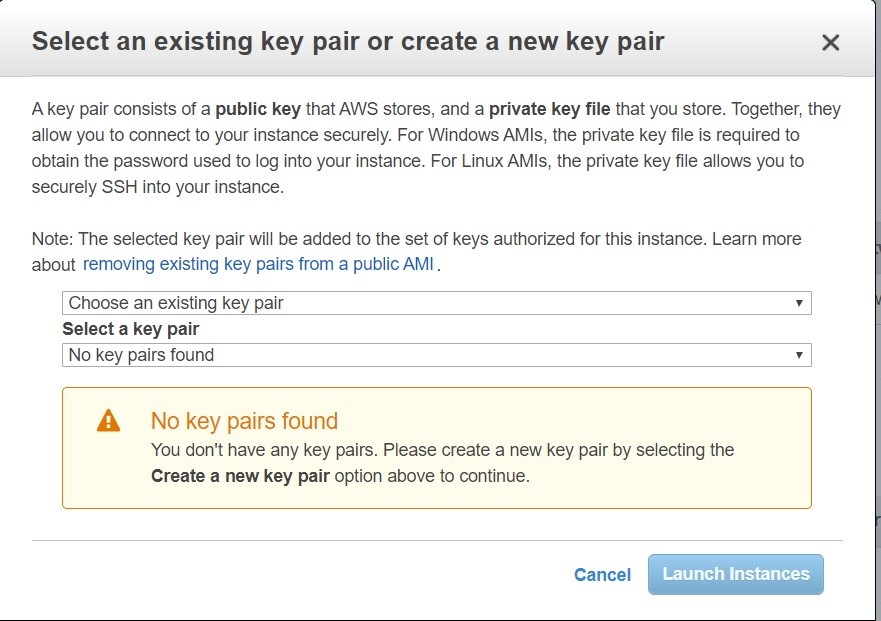
Figure 6 | Key pair creation
Choose “Create a new key pair” from the drop-down menu and give the keys an appropriate name. Download the key pair after and launch.

Figure 7 | Downloading a new key pair
You can see the parameters of your Instance in the highlighted rectangle in the next section (see Figure 8). This information includes your URL and IP address to access your Instance.
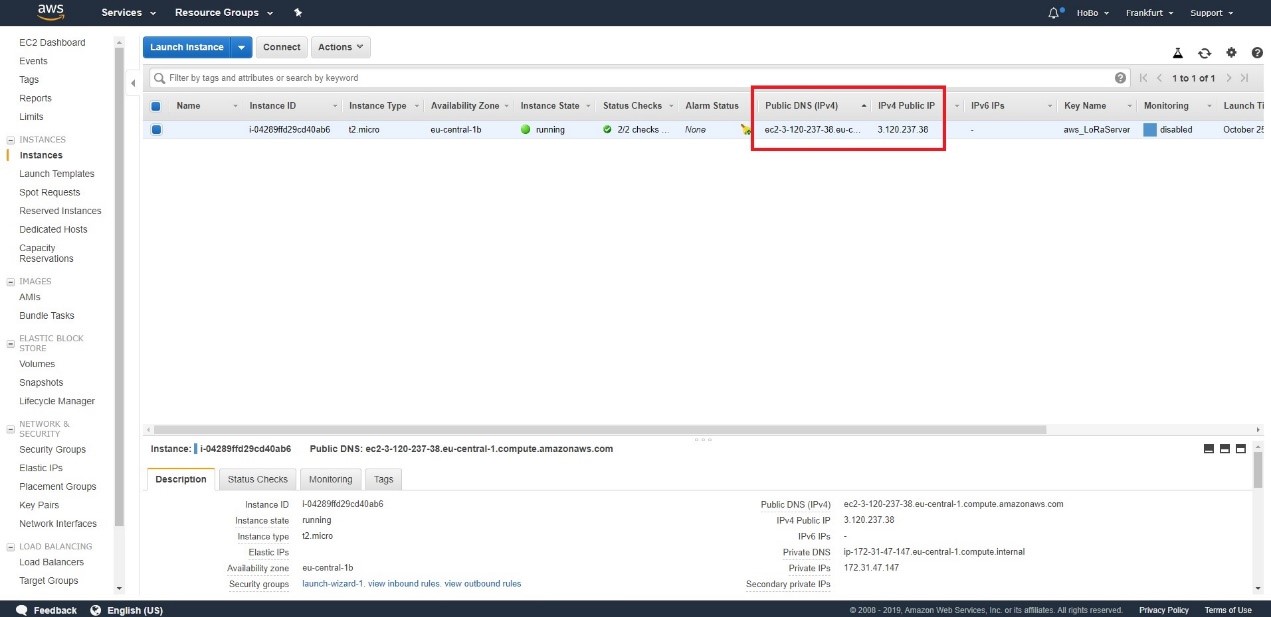
Figure 8 | Instance parameters
Using PuTTY
Access to the Instance via SSH is done in PuTTY, a free and open-source terminal emulator. Download and install it. Once done, in the AWS Instance page, mark your instance, and click “Connect.” You will see instructions that you should follow.
Note that we first need to convert the keys from . pem format to . ppk format as this is what PuTTY uses. This is done with PuTTYgen, which comes standard with the PuTTY package.
Run PuTTYgen. If you are using Windows, just type it in the start menu after installing PuTTY. In the main window, select the “ Type of key to generate” as “RSA” (should be the default choice). In older versions, it is named “SSH-2 RSA.”

Figure 9 | PuTTYgen main window
After that, press “Load” to select the key files generated by AWS (make sure to select All Files (.) from the drop-down menu as by default, only . ppk files are shown). Once successfully loaded, you can save them in . ppk with the “Save private key” button. Use the same name as the original . pem file. The .ppk extension will be added automatically. PuTTYgen displays a warning about saving the keys without a passphrase (i.e. a private key that serves as another layer of protection). Ignore it and choose “Yes .”

Figure 10 | Saving the public key in PuTTYgen
As your private key is now in the correct format, you can create an SSH session with PuTTY. Open the client and select “SSH.” Correct the hostname to this format: user_name@public_dns_name. As an example, if your user_name is ubuntu and your public_dns_name is: ec2-3-120-237-38.eu-central-1.compute.amazonaws.com, your hostname will be [email protected].
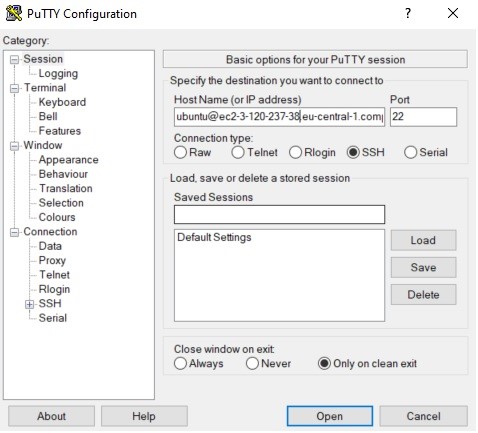
Figure 11 | PuTTY main window with the hostname
Use your keys in PuTTY by going to the “Category” panel. Expand “Connections,” expand “SSH,” and select “Auth.” Click the “Browse” button and look for your . ppk file. Should you want to save this configuration for further use, you may go back to the “Session tab” and save a name in the “Saved Session” text box.
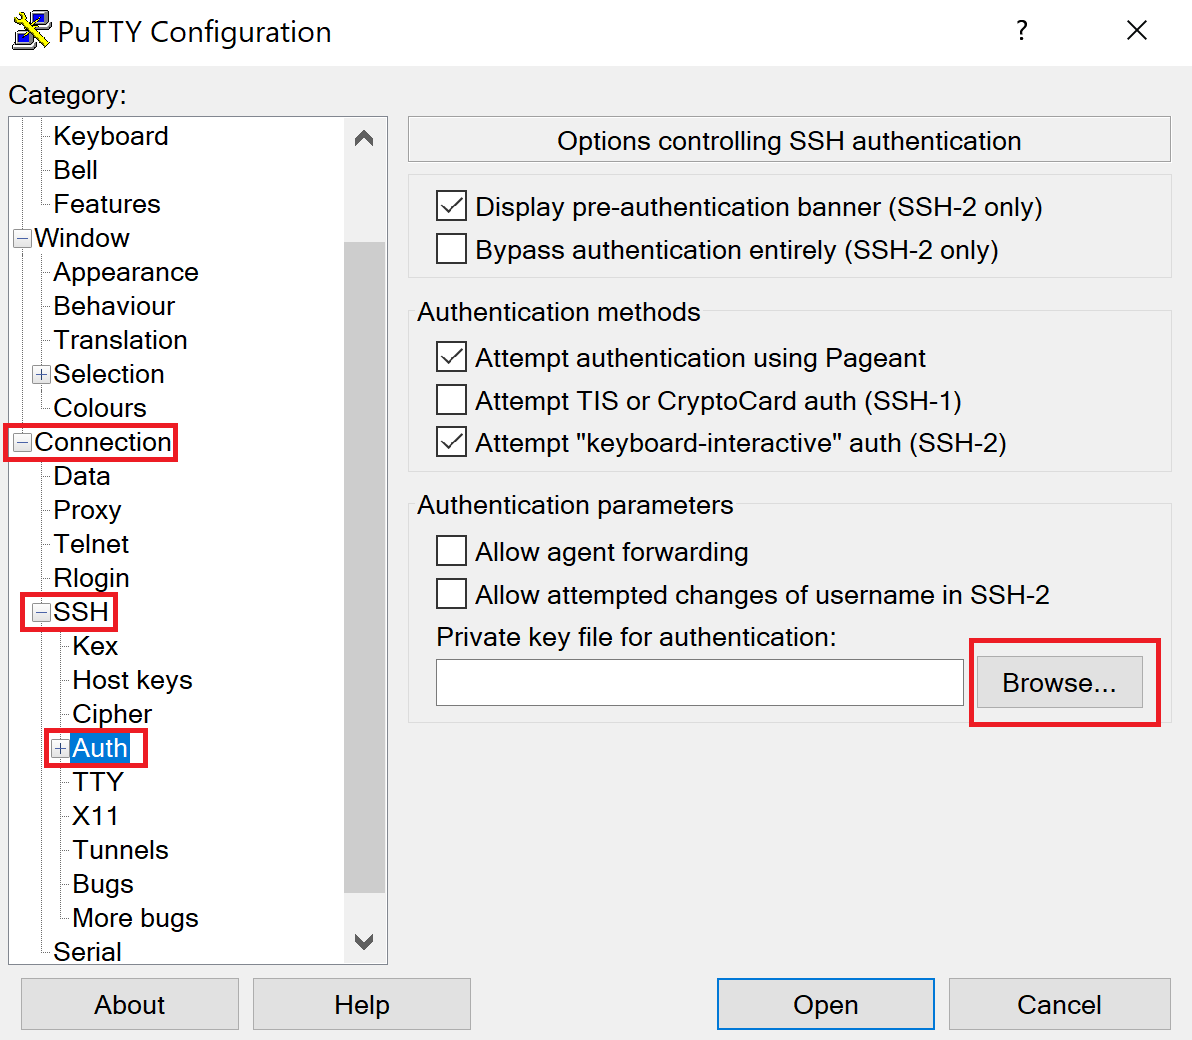
Figure 12 | PuTTY SSH Authentication
Click “Open” to initiate the session. If this is your first time connecting, PuTTY will ask for confirmation (click “Yes”). You should see the command line window to your Instance now.

Figure 12 | PuTTY SSH Command line
Installing ChirpStack
Since it is good practice to always update your packages, run the following commands in the terminal:
sudo apt update
sudo apt upgrade
After completing the procedure, install ChirpStack and its dependencies. First install Git with this command: sudo apt install git. Then, clone the RAKwireless Ubuntu ChirpStack repository:
git clone https://github.com/RAKWireless/chirpstack_on_ubuntu
Open the newly created folder with this command, cd install_chirpstack_on_ubuntu , after the cloning is complete.
Run the installation script: sudo ./install.sh
Check if all information went through by executing these commands:
sudo journalctl -f -n 100 -u chirpstack-application-server
sudo journalctl -f -n 100 -u chirpstack-network-server
You should see no errors in this process (see Figure 13). Do not forget to interrupt the output of the commands above with the key combination “Ctrl+Z” so you can proceed with the configuration process.
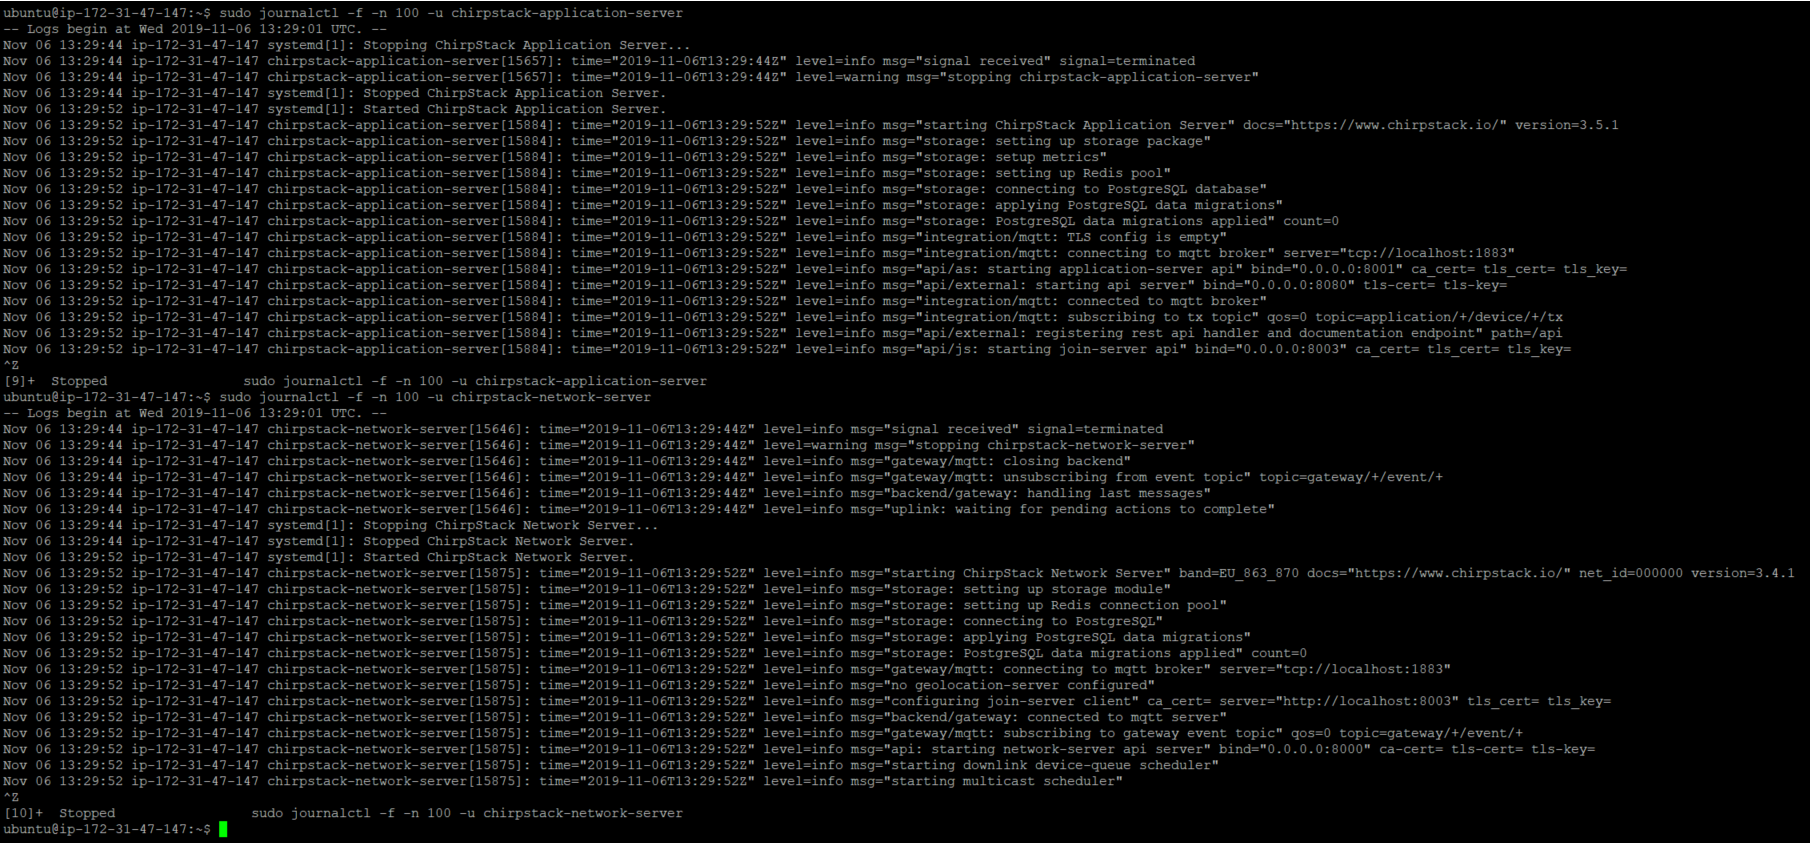
Figure 13 | ChirpStack Journal Control Output (no errors)
Installing the Gateway Bridge
Run the following commands as these will update the Ubuntu repositories:
sudo apt-key adv --keyserver keyserver.ubuntu.com --recv-keys 1CE2AFD36DBCCA00
sudo echo “deb https://artifacts.chirpstack.io/packages/3.x/deb stable main” | sudo tee /etc/apt/sources.list.d/chirpstack.list
sudo apt-get update
Proceed with installing the bridge itself: sudo apt-get install chirpstack-gateway-bridge
Start the bridge service: sudo systemctl start chirpstack-gateway-bridge
To see if the bridge is working, run this command: journalctl -u chirpstack-gateway-bridge -f -n 50

Figure 14 | Gateway Bridge Journal Control output (no errors)
Configure the AWS Security
By default, all inbound traffic to an AWS Instance is blocked, only port 22 (SSH) is open. You need to add a set of rules so, the Gateway and ChirpStack Network Server can communicate:
- The Semtech Packet Forwarder needs UDP port 1700;
- The MQTT Bridge (unsecured) needs TCP port 1883 ;
- The MQTT Bridge (secured) needs TCP port 8883 ;
- The ChirpStack Web UI needs TCP port 8080 .
In doing so, open the “Security Groups” tab in the AWS dashboard.

Figure 15 | AWS security groups
Select your desired security group (i.e. “Ubuntu Instance”). If you have multiple instances, you can use the date and time of the group’s creation as a guide to determine the right instance to use.
Click the “Action” button and from the drop-down menu, select “Edit Inbound Rules.”

Figure 16 | Security Group inbound rules
Press the “Add Rule” button and add all four rules earlier. It is good practice to name these according to what each of the rules represents. Once added, save the rules by pressing the button in the lower right corner.
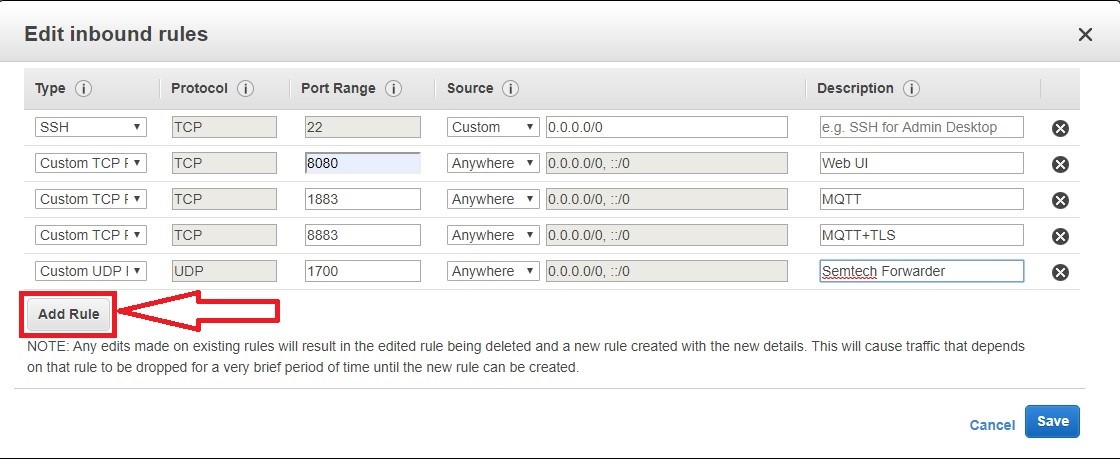
Figure 17 | Adding inbound rules
Finally, check if your rules are working by entering your Instance’s Public IP address using Port 8080 in a browser window. You should see the login page of the ChirpStack Web UI (for example, 3.120.237.38:8080 as seen in Figure 18).

Figure 18 | ChirpStack login page
Please note that the default Username/Password is admin/admin . Additionally, there are profiles already created in the RAKwireless ChirpStack installation, so you do not need to make those yourself. You may directly proceed to add your gateway.
Configuring your gateway
In setting up your gateway, you have two options: using the Semtech Packet Forwarder and using the MQTT bridge. You may proceed to the respective sections of your choice to follow the appropriate instructions.
Using the Semtech Packet Forwarder
In the Gateway Web UI, go to the “LoRa® Gateway” tab and open the “LoRa® Packet Forwarder” sub-menu. To learn more about the configuration of your RAKwireless gateways, you may refer to these two links: RAK7249 and RAK7258.
By default, the gateway is set to point to The Things Network (TTN) via the Semtech Packet Forwarders. You only need to change the server address to forward the traffic to your ChirpStack server running on the Ubuntu Instance (as in AWS). Enter your Instance’s Public IP address in the field marked with the red rectangle in Figure 19.

Figure 19 | LoRa® Packet Forwarder configuration
Apply the changes and go to your ChirpStack Web UI running on the AWS Instance (IP address: 8080). Go to the “Gateway” tab and press the “Create” button.

Figure 20 | ChirpStack gateways creation
In the next window, input the name, EUI, and description of the gateway. Select a network server and service profile (i.e. those are pre-configured with the RAKwireless image) from the drop-down menu. Click the “Create Gateway” button.
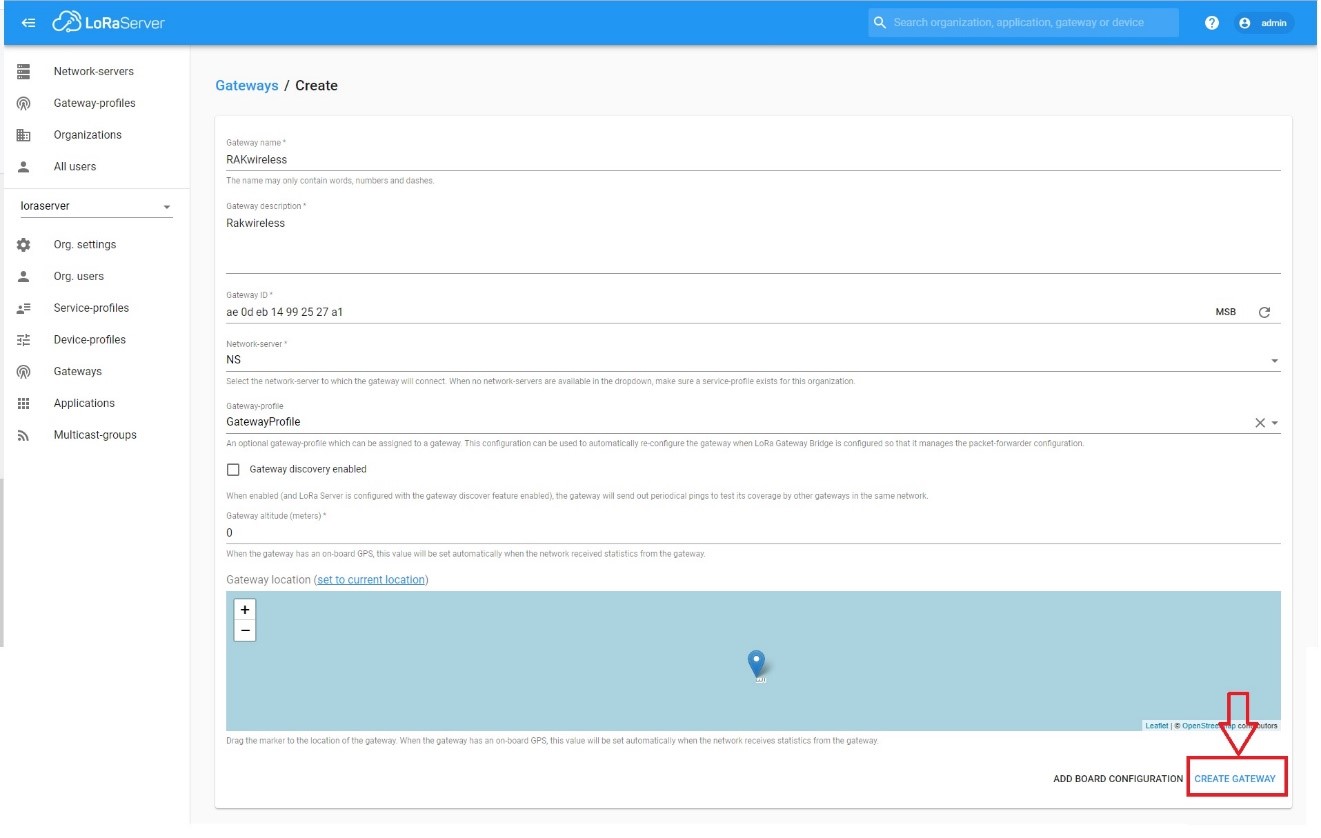
Figure 21 | ChirpStack gateway parameters
Assuming the parameters are entered correctly, you will see your gateway status in the “Gateway Details” tab. You can also monitor incoming traffic in the “Live LoRaWAN® Frames” tab.

Figure 22 | ChirpStack gateway details
Using the MQTT bridge
To forward your LoRa® traffic to your LoRa® network server, configure your gateway using the MQTT bridge. Go back to the Gateway Web UI and go to the “Packet Forwarder” sub-menu. Change the protocol from the drop-down menu to “LoRa® Gateway MQTT Bridge.” Save and apply this setting.
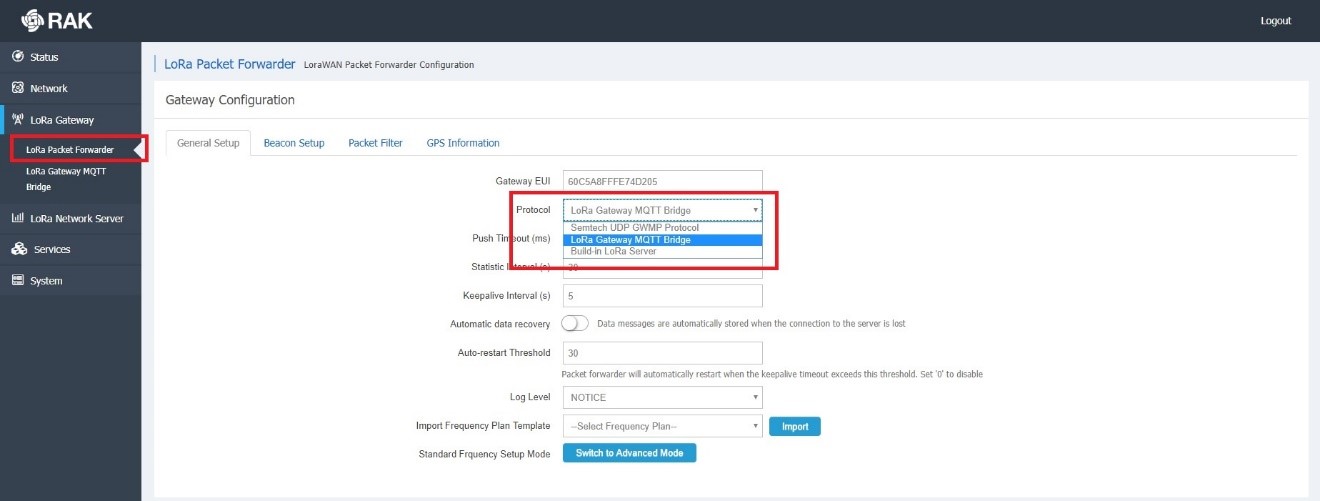
Figure 23 | Gateway MQTT bridge protocol
Next, go to the “LoRa® Gateway MQTT Bridge” sub-menu. Enable the functionality with the blue slider and choose the type of LoRa® network server you are going to use. This setting is important as there is a difference in the MQTT topic templates, JSON vs Protobuf, for 2x vs 3x respectively. Set the address to the address of the AWS Instance and the port to 1883. Save and apply.
.

Figure 24 | Gateway MQTT bridge parameters
Lastly, add the gateway in ChirpSTack if you haven’t (like when you used it instead with the Packet Forwarder).
The ease of connecting to the AWS that you have seen in this tutorial has convinced thousands of developers and entrepreneurs to convert to AWS. Developers and engineers are amazed by the platform’s compatibility with known programming languages such as JavaScript, Python, C, Java, mobile software development kits (SDKs) for iOS and Android, and SDK for Arduino. In the coming years, AWS being a staple cloud service that connects everything will happen not without prior expectations.