Optimizing LoRaWAN Communication on RAK3172 – Configuration & IDE Choice

Hello,

I am new to LoRa and RakWireless products, and I am currently working on my final year project, which involves implementing LoRaWAN communication for an agricultural application.

I successfully connected the RAK3172 module to a RAK7289 gateway and managed to send and receive uplinks and downlinks. I used Arduino IDE for programming, basing my code on the provided LoRaWAN_OTAA example.

Now, I have two main questions:

  1. Configuring LoRa Parameters:
    I want to modify parameters such as spreading factor (SF), bandwidth (BW), transmission power, preamble length, and coding rate to optimize range and power consumption. However, I could not find a way to adjust these settings within the api.lorawan structure. I also tried installing some libraries, but I have yet to find one that supports the STM32WL architecture used by the RAK3172.

  2. Switching to STM32CubeIDE:
    Since I faced difficulties in Arduino IDE, I considered using STM32CubeIDE. However, before investing too much time, I would like to know whether switching to STM32CubeIDE is a good choice or if it is even necessary for my use case.

Any guidance or recommendations would be greatly appreciated. Thank you!

Hi @skan ,

It seems you are at the right track.

  1. LoRaWAN will not allow you to change the bandwidth, preamble length and coding rate. This is already handled by the LoRaWAN stack. Are you optimizing during LoRa transmissions? If yes, maybe you can consider to use RAK3172LP-SiP which is optimized for low power application. But if not (you have high current on idle), then you should be looking on something else and not on these parameters.

  2. STM32CubeIDE is more complex in my opinion. Arduino IDE already provided lots of abstractions which makes it easier to use.

Hi mr @carlrowan

Thank you for your response! I appreciate the clarification regarding LoRaWAN managing bandwidth, preamble length, and coding rate internally. However, I wanted to understand why I can’t modify these parameters directly in my RAK3172 Evolution Boared code. Since I am writing the firmware and configuring the LoRaWAN stack, wouldn’t there be a way to override or customize these settings at a lower level, such as through direct modifications in the LoRa stack or radio driver? Or is it strictly enforced by the LoRaWAN specification, making it impossible to change?

Also, when you mentioned “Are you optimizing during LoRa transmissions?”—could you clarify what you mean by that? Are you referring to optimizing power consumption during transmission, such as using duty cycling, adaptive data rate (ADR), or sleep modes? Or do you mean optimizing based on environmental conditions like interference and range?

Thanks again for your insights!

My main objective is to modify the range and control power consumption between the RAK3172 module and the RAK7289 gateway. I am particularly interested in adjusting parameters that directly affect these factors.

Since I am using Arduino IDE, I have not yet found the exact lines of code that allow me to modify key parameters like Spreading Factor (SF) and Transmission Power. From my understanding, these parameters should have a significant impact on both range and power efficiency.

Could you guide me on the best way to achieve this within the Arduino environment? Are there specific functions or commands within the LoRaWAN stack for modifying these settings, or do I need to handle them differently? Also, are there other parameters besides SF and power that I should consider for optimizing range and energy consumption?

This the code that i’m currently using

// Set your credentials
#define OTAA_BAND (RAK_REGION_EU868)
#define OTAA_DEVEUI {0xAC, 0x1F, 0x09, 0xFF, 0xFE, 0x17, 0x87, 0xDB}
#define OTAA_APPEUI {0x00, 0x00, 0x00, 0x00, 0x00, 0x00, 0x00, 0x00}
#define OTAA_APPKEY {0x06, 0xA6, 0x98, 0x28, 0xAC, 0x7C, 0x00, 0x60, 0xCF, 0xD3, 0x1A, 0xF8, 0xCE, 0xFE, 0x77, 0x0B}

#if defined(WISBLOCK_BASE_5005) || defined(WISBLOCK_BASE_5005_O)
#define GREEN_LED_PIN LED_GREEN // Default green LED pin
#define BLUE_LED_PIN LED_BLUE   // Default blue LED pin
#else
#define GREEN_LED_PIN WB_IO2    // Replace with your specific green LED pin
#define BLUE_LED_PIN WB_IO3     // Replace with your specific blue LED pin
#endif

void joinCallback(int32_t status) {
    Serial.printf("Join status: %d\r\n", status);
}

void recvCallback(SERVICE_LORA_RECEIVE_T *data) {
    if (data->BufferSize > 0) {
        Serial.println("Downlink received!");

        // Blink the green LED for downlink indication
        for (int i = 0; i < 3; i++) {  // Blink LED 3 times
            digitalWrite(GREEN_LED_PIN, HIGH);
            delay(200);  // LED on for 200ms
            digitalWrite(GREEN_LED_PIN, LOW);
            delay(200);  // LED off for 200ms
        }

        // Process received data
        Serial.print("Received data: ");
        for (int i = 0; i < data->BufferSize; i++) {
            Serial.printf("0x%02X ", data->Buffer[i]);
        }
        Serial.println("\r\n");
    }
}

void sendDataToGateway(const uint8_t *data, uint8_t size) {
    uint8_t port = 1;  // Application port
    bool confirm = true;  // Confirmed message
    uint8_t retry = 3;  // Retry attempts

    if (api.lorawan.send(size, (uint8_t *)data, port, confirm, retry)) {
        Serial.println("Data sent successfully!");

        // Blink the blue LED for uplink indication
        for (int i = 0; i < 3; i++) {  // Blink LED 3 times
            digitalWrite(BLUE_LED_PIN, HIGH);
            delay(200);  // LED on for 200ms
            digitalWrite(BLUE_LED_PIN, LOW);
            delay(200);  // LED off for 200ms
        }
    } else {
        Serial.println("Failed to send data.");
    }
}

void setup() {
    Serial.begin(115200, RAK_AT_MODE);
    delay(2000);

    Serial.println("RAKwireless LoRaWAN OTAA Example");
    Serial.println("------------------------------------------------------");

    pinMode(GREEN_LED_PIN, OUTPUT);
    pinMode(BLUE_LED_PIN, OUTPUT);
    digitalWrite(GREEN_LED_PIN, LOW);
    digitalWrite(BLUE_LED_PIN, LOW);

    // Set up LoRaWAN OTAA
    uint8_t node_device_eui[8] = OTAA_DEVEUI;
    uint8_t node_app_eui[8] = OTAA_APPEUI;
    uint8_t node_app_key[16] = OTAA_APPKEY;

    if (!api.lorawan.band.set(OTAA_BAND)) {
        Serial.println("Failed to set band.");
        return;
    }
    if (!api.lorawan.deviceClass.set(RAK_LORA_CLASS_C)) { // Continuous receive mode
        Serial.println("Failed to set device class.");
        return;
    }
    if (!api.lorawan.njm.set(RAK_LORA_OTAA)) { // Set OTAA mode
        Serial.println("Failed to set network join mode.");
        return;
    }

    api.lorawan.appeui.set(node_app_eui, 8);
    api.lorawan.appkey.set(node_app_key, 16);
    api.lorawan.deui.set(node_device_eui, 8);

    api.lorawan.registerRecvCallback(recvCallback);
    api.lorawan.registerJoinCallback(joinCallback);

    // Attempt OTAA join with retry logic
    for (int attempt = 0; attempt < 5; attempt++) {
        if (api.lorawan.join()) {
            Serial.println("LoRaWAN join successful!");
            break;
        }
        Serial.printf("Retrying join... Attempt %d/5\n", attempt + 1);
        delay(10000);
    }

    if (api.lorawan.njs.get() == 0) {
        Serial.println("Failed to join network after 5 attempts.");
        return;
    }

    Serial.println("RAK3172 is ready to send data and receive downlinks.");
}

void loop() {
    uint8_t testData[] = {0x01, 0x02, 0x03}; // Test uplink data
    sendDataToGateway(testData, sizeof(testData));

    delay(3000);  // Send data every 3 seconds
}
Hi @skan ,

Let me reply on some of points:

  1. The LoRaWAN stack enforces what is on the standard of LoRa Alliance. Other than your ability to change DR (if ADR is not enabled) and TX power, other parameters are set by the standard. I highly recommend to read the standard and regional parameters document. Also, there are regulations on each regions how much power you can send via LoRa uplinks/downlinks. That will limit TX power but that is not on the stack because it has various external factors like antenna gain, losses in connectors/cables, etc.

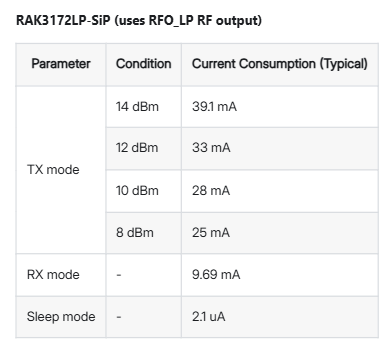
  2. When I say optimization, the STM32WL has two RF output path. For high and low power, only the RAK3172LP-SiP variant that uses low power output. The trade off is your allowed TX power is reduce. Please check the the table for the TX power possible on RAK3172LP-SiP. Please note this is not for RAK3172 that you have which allows for full TX power range.

image

  1. If you want to optimized your power consumption with SF and TX configuration, you can test it in actual deployment. See what lowest SF and TX power possible based on RF signal readings - RSSI and SNR. This is achievable on actual deployment and not related to LoRaWAN stack. Aside on ADR, there is no inherent power optimization possible on LoRaWAN stack.

  2. These are the links of DR and TXP documentation with example codes.

2 Likes

Hi mr @carlrowan,

Thank you for your detailed response! I really appreciate the insights you provided regarding the LoRaWAN standard, regional parameters, and the RF output paths of the STM32WL. I’ll definitely look into the standard and regional parameters documentation to gain a deeper understanding.

After further research, I experimented with the following code to maximize range:

// Set to maximize range
api.lorawan.adr.set(0);  // Disable ADR (Adaptive Data Rate)
api.lorawan.dr.set(0);   // Set DR0 (SF12 for maximum range)
api.lorawan.txp.set(20); // Set maximum transmission power (EU868 max is 16 dBm, but assuming 20 dBm for the example)
api.lorawan.rx2dr.set(0); // Set RX2 data rate to SF12
api.lorawan.rx2fq.set(869525000); // Set RX2 frequency for EU868
api.lorawan.rety.set(5); // Increased retries for reliable transmission
api.lorawan.jn1dl.set(5000);  // Set Join Accept 1 delay (5 seconds)
api.lorawan.jn2dl.set(6000);  // Set Join Accept 2 delay (6 seconds)

With these adjustments, I managed to gain better control over the range and transmission reliability.

Thanks again for the guidance! Any further suggestions or feedback would be greatly appreciated.

Good to know these configuration help.

Btw, if you plan to fix these parameters on the device. You can also consider to configure these parameters via AT command and remove them from the code. They are saved on flash so only have to do it once.

1 Like

ok thanks for the help mr @carlrowan

This topic was automatically closed 10 days after the last reply. New replies are no longer allowed.